Sunday, 30 September 2012

Hidden Treasure: Finished!


Do you remember last year, when I received a crochet blanket, which my Nan had left part way through? As a refresh, here is what it looked like on the night it was uncovered...


Well, in betweeen all the other projects I've been working on, this has had the odd row added to it. It's travelled with me everywhere - to see the Olympic Torch relay, up to Hadrian's Wall, down to Torquay, into Wales and everywhere I've been.

And this week? I finished it!


I was originally going to give it a white and turquoise border, but I simply wasn't feeling it. I needed it to be suitable for a boy or a girl, and rainbows have meant a lot to me on a very personal level recently.


Whilst a touch feminine, I think this pastel rainbow would suit any baby perfectly. Worst case scenario, the peach and yellow borders can be unravelled for a slightly more boy-ish feel!

I am so thrilled to have had the honour to finish this blanket that my Nan started. When it is laid out, you can see where she finished off and I picked up, as I simply could not get our styles to match. It all adds to the charm, though. 

I worked the main body in treble crochet, with the border (2 rows each of white, lilac, blue, turquoise, yellow and peach) in single crochet. And that peach? Yup, it's the one which was in the bag the blanket was found in, which my Nan had been making granny squares with :)

Saturday, 29 September 2012

The Younger Years V


Growing up, my family had quite a few pets - a budgie, a bunny, and four goldfish to be precise! I believe this to be an early painting of my childhood bunny, Flopsy.

Pet Portraits are one of my main focusses now. Time may pass between them, but it is a skill which I have developed more than most, and which I intend to pursue much further.

It's fascinating to see my beginnings. I would love to make a comment on how I have attempted to capture the texture of the fur with my brush strokes, but I was probably just loathe to paint the whole page black/use up all my paint... I never wanted to run out!!


A somewhat more recent drawing! And yes, one of my current bunnies is called Flopsy too!
 

Sunday, 23 September 2012

Wedding Card


I love making cards for weddings. I feel like it's a chance to do something a bit exciting, and play around with the concepts of love, and two becoming one.


pearl heart beads from Singapore • pearl thread • pink beads • grey hexagonal beads


pearl paint • cream linen paper • metallic charcoal paper • pink parchment paper

Saturday, 22 September 2012

Inspire: Realism Challenge


I am so excited by this weeks Inspire! On his Youtube channel, Mark Crilley has been challenging himself to draw as realistically as possible, and has been showing his attempts in timelapse videos.


His work is brilliant! I have been really struggling with patience when drawing recently, but having seen these examples, I am going to try really hard to sit myself down and attempt a realism challenge myself...


Any ideas?! A crumpled ball of paper, an ice cube, a paper aeroplane... There are so many options! I don't think I can face anything quite as detailed at the King of Clubs yet though ;)


[Apologies for missing Tried and Tested this week, real life got in the way! I have got some exciting tips coming up though!]

Friday, 21 September 2012

My First Linocut


You may have to excuse my sheer level of excitement when it comes to this... When I was printing with my Dad the other month, he lent me the equipment to try lino cutting. And the other day? I eventually got round to trying it!


My inspiration was this sketch of a yellow poppy that I did last year:


I found the tools somewhat easy to use with the lino, although there are a few cuts which aren't quite meant to be there!


Because I've never tried this before, I did a test run with some acrylic paint I had out, to see if I had cut the lines deep and wide enough to show up...


It's obviously not great, but it showed what I needed to know - that it could work!

So I took it to my Dad's press (I think it's the proofing press we used) and we got this amazing print!


I can't wait to go back and experiment more, I'm hoping to do a whole run of greetings cards :)

The lino cut itself also looks quite pretty!


I'm really not sure what my next design will be, but one thing I do know: I love this process!

Saturday, 15 September 2012

The Younger Years IV


I still remember making this image, in year 4 at school. I don't remember why we were printmaking, but I remember using string to create the image at some point, and presumably doing relief work too. I suppose I share it now because I have a sheet of linoleum sat on my desk just waiting for me to make a linocut. I know the exact image I'm going to use, it's just making that first mark which is always so difficult! But, does it really matter if it doesn't work out like I intend?

As a friend reminded me yesterday, "In art there are no mistakes, only possibilities".

Thursday, 13 September 2012

Crochet Shrug


Earlier this year, my husband brought this dress home from a charity shop, knowing that I could resize it to make it fit. It was just a size too big, so I turned it inside out and simply took about an inch in on each side, around the mid section.


The next problem? I didn't have a single top to go with it! I started scouring the internet for a suitable shrug pattern, and came across this, the Easy Shell Shrug. The very word "easy" filled my heart with glee! And then I got started... Now, I don't mean to be wholly negative about this pattern, but I did have a lot of issues.


I started by making a mockup in some scrap wool, and discovered the number of stitches and sizes were a bit odd, the fit wasn't quite right, and the collar section didn't sit flat for me.


I made some changes, and moved on to my finished piece, using just under three balls of an incredibly lovely black crochet cotton [I'll update soon with the exact one!]

To make the shrug to fit me, approx UK size 12, I began with 21 shells across - this required a base chain of 85:
(21 x 4) + 1
(number of shells needed x 4) + an extra stitch

So following the pattern, I had a base chain of 85, then completed Row 1 to make my 21 shells.

I then repeated Pattern Rows 2 & 1 14 times, ending on the pattern, rather than creating a straight edge. If I added any more rows, I felt like the sleeves became too baggy.

I returned to my base chain, and created 21 shells facing the opposite way - imagine a reflection. This meant that I had a nice shelled edge on the long sides of my rectangle.

Next, I joined the shrug by crocheting/stitching together the outer 3 shells at each end.

At this point, the shrug looked like this, and wasn't quite long enough for me to wear comfortably:


So I started experimenting to add extra length. I tried increasing shells along the bottom edge in a curve, but it wouldn't sit flat. In the end, I crocheted a row of 16 shells [needing a base chain of (16 x 4) + 1 = 65], and crocheted shells back along the base chain, to create the "reflection" again. I stitched this on to the shrug, making sure the deep bit of the shells on the strip sat into the shell recesses of the shrug, and vice versa (the deep bit of the shells on the shrug sat into the recesses of the shells on my strip). I repeated this with a row of 14 shells [needing a base chain of (14 x 4) + 1 = 57], and crocheted shells back along the base chain, to create the "reflection", and stitched it onto the shrug as before, attaching it to the previous strip.

This created a low enough back for me to wear comfortably (see the first picture!) I think if I wanted another shrug I would find a different pattern altogether, but I am happy with it, especially for my first proper piece of crocheted clothing!

With sincere thanks to my husband for the photography!

Saturday, 8 September 2012

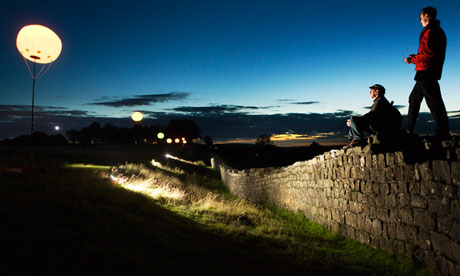
Inspire: Connecting Light, Hadrian's Wall

[source: Connecting Light]

Last weekend saw a stunning installation take place on Hadrian's Wall.

[source: Connecting Light]

The installation, Connecting Light, was part of the London 2012 Festival, and explored the ideas of borders and connections.

[source: David Ambridge]

People could either send a text message, or a message via the website, which would then be transmitted across the balloons as coloured impulses. Stunning!

[source: The Guardian]

It's so inspiring - I am hoping to do a much smaller installation locally next year, and seeing other's work challenges me to think of the different aspects involved.


[P.S. Sorry for missing The Younger Years last weekend, I couldn't access my harddrive - hopefully all will be back next week!]

Rainbow Ribbons Card


I love rainbows. If having a rainbow wedding hadn't made it obvious...!


And what better combination for my niece's 4th Birthday?!


Oooooh.

Wednesday, 5 September 2012

Tried & Tested Tip Number 17 [Google Image Search]


Have you heard about Google's latest image search feature yet? Basically, Google has a new feature allowing you to search the internet with an image you already have.

What's the point? Well, here's a few examples...

Do you have an image you're trying to find the original source for? A quick Google image search could help.

Are you concerned about images of your art being stolen, or someone pretending it is theirs? A quick Google image search could help.

Do you want a higher resolution of an image you have found? A quick Google image search could help.

 Their full guide is here, but basically you can search using four different techniques, depending on what is easiest for you. I decided to download the Firefox extension, meaning I can just right click on any image and access the search function immediately. Let me give you an example.

This is a cake I made a couple of years ago, and uploaded to my deviantArt account.


With the Firefox addon, I can simply right click on my image, and select the option, "Search Google with this image".


With my settings, this opens the search in a new tab, and you can see all the different results below:


This really is such a useful feature to keep track of your own work, and to access other images you want. I hope you find it as helpful as I am!

Related Posts Plugin for WordPress, Blogger...